Once I'd decided to stick with 'Paul', my kind-but-timid, obese man, I started drawing the front, back and side images in Photoshop, in order to use them for referencing in Maya. It took longer than expected to match the proportions up correctly...
It was after I'd finished all of this work when I realised I'd made a 'big' mistake (pun intended). One of the first things I read in the modelling tutorial that I was about to begin, was that you should strictly avoid modelling large/fat/obese characters until you're very confident with the modelling and rigging process. This does essentially make sense, due to the huge amount of restriction that can be caused by oversized limbs, especially with movement and making sure, for example, that the arms don't swing through the torso. I also discovered at this stage that the tutorial was for modelling with NURBS - something I'd never tried before - so I started a very basic, simple model to start experimenting.
Getting used to the laborious naming conventions... (click image to enlarge)
I actually found that modelling with NURBS gave me a lot of freedom and control over the body shapes, as it was almost entirely done with lattices. However I felt it was almost too easy, as it didn't provide the detail and intricacies that I'd want from a humanistic model.
Evidence of attempting some realistic anatomy, indicated by the sloping blue line in the forearm.
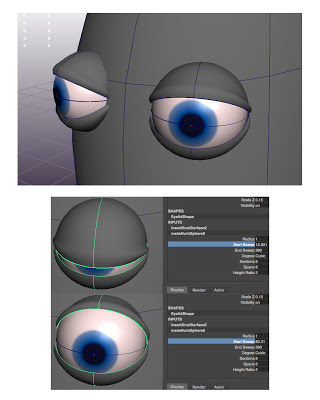
The eyes, although slightly more challenging, were great fun to make. I applied a Phong texture to the eyeball itself, giving it a glossy appearance, and made a Ramp shader to go with it to make the pupil and iris. I attempted to give the eyelids a realistic looking ridge around the edge of their surface, and gave them controls so that they could be animated (see 'Start sweep' and 'End sweep').
Although NURBS modelling was great in terms of practice, I decided to discard my character so that I could start modelling with polygons again; this time hopefully creating something looking a little more professional. The character I created next was a frail looking, old man with a bit of a tummy (in lieu of my original character that I never got to model)! The character was a mixture of imagination and references from online resources.
I started modelling from the arm, as opposed to the torso which I'd done with the NURBS tutorial.
In order to create the head, I began with a simple polygon plane, rotated on its Z axis to line up with the side view of the face. I then added subdivisions and edge loops according to proper facial topology, and began to extrude the faces out and around the shape of the head.
I was amazed by just how much detail I could give this character, all within Maya - such as the rolls of flab, the knobbly fingers, and the bone definition in the knees and shins. I did come across a few problems with my obsessive fiddling with vertices and adding edge loops, such as finding and trying to get rid of Ngons, but after some scrutinization and playing around it didn't affect the work at all.
The model is not yet finished, there are a great number of adjustments I need to make (such as pushing out the rib cage to create a more rounded torso), but I'm proud of how far I've managed to take this character. The next real step I need to make is learning the process of UV mapping, so that I can texture him and then eventually rig him.


No comments:
Post a Comment