May 13, 2013

Pre-Production

Below are notes I made in preparation for this unit's performance piece, looking at the who/what/when/where/how of the scene, the considerations I've made during the planning process, a lay-out for the scene location, and thoughts behind the appearance of my main character.

(click to enlarge)

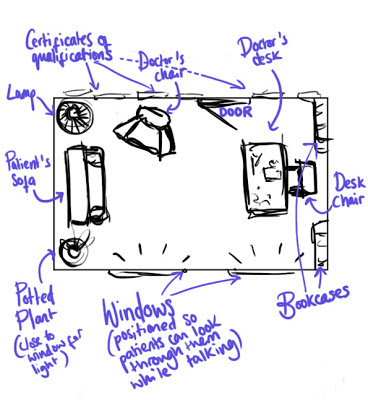
A revised set-design. 

Although we will not be marked on anything other than the performance animation, I hope to have my backdrop as close to (my idea of) a psychologist's office as possible, in order to set the correct tone of the piece. The fact that my dialogue is essentially a daydream could be confusing enough without having to figure out where, and therefore who, the characters are.
My finished storyboard.

This was certainly a challenging storyboard to make! Unlike anything else I've done, all of the action takes place in one small, concentrated area. I tried not to rely too heavily on my acting performance, and drew hand gestures that seemed relevant to the text, including the subtext behind it. As the dialogue is mostly Dr. Sobel's daydream, I didn't want to draw any focus away from him, which is why I've only used three different shots.
Lots of arm movement!

Below is my animatic. Spot the 'W' pose! Although this is seen as quite a clichéd, pantomime-like movement for performance animation, I believe it compliments the dialogue and would be appropriate for the frustration and disbelief my character is feeling.


The next step was character design...

Although the 'Morpheus' rig has excellent customisation capabilities, I couldn't quite find what I wanted from the pre-set features. To get around this, I took the original textures into Photoshop and spent a couple hours going back and forth into Maya, tweaking them until they looked right (I did not realise initially which areas of the texture would be stretched in order to wrap around the model's head).

I figured that as Dr. Ben Sobel is a tired, frustrated man with little interest in his job, it should definitely reflect in his appearance! I decided to make his skin tone quite washed out, implying that he doesn't get outdoors much, grey lines under his eyes to indicate tiredness, and a 5 o'clock shadow (painted with a 1px brush!) to portray lack of care in his appearance. I also painted over one of the eye textures to make them look grey and lifeless.

With Caroline, I wanted to create his opposite - tanned skin, bright, blue eyes and makeup - implying care and thought in her appearance, not to mention youth. In the film, Caroline is portrayed as a middle-aged woman, but I feel that for the sake of my scene, the audience needs to relate to the main character, and therefore feel resentment for Caroline. Although blonde-hair-blue-eyes could be seen as a rather clichéd approach to a young, perhaps materialistic, woman who moans about her failing love life, it will at least provide an interesting, contrasting aesthetic to the scene.

Performance

The first thing I wanted to do in preparation for my animation was tackling the dialogue. I converted my chosen scene from 'Analyze This' into an mp3, and listened to it on repeat in hope that it might find its way into my subconscious. I then wrote out the text to properly study the nuances in the speech.

I did my best to notate the essentials to gain a true understanding of the text and dialogue. I based most of this on the sound recording of Billy Crystal's voice, as opposed to my own, as that is what I'll be animating. By this stage I was definitely able to recite the text in my sleep, so despite all embarrassment, I decided to film myself as a reference for my animation. I took many, many takes of myself acting out the piece, and I found my performances were becoming more confident towards the final takes. As I went along, I experimented with different actions and movement, as opposed to trying to do the same thing again and again. This meant that I could have a wide breadth of choice when it came to choosing which parts I wanted to reference.


Above is a compilation of a number of different takes, split up into sections to make it easier to find which reference to work from. It's clear that I'm not exactly comfortable in front of the camera and my semi-American accent only makes things worse - despite the fact that a British accent could have made a subtle change the dialogue and facial movements. Also, it's obvious that I was too embarrassed to shout fully at the end, which could have affected my acting; something that should be rectified if I am to film myself performing this dialogue again. For an example of one full take, see: http://www.youtube.com/watch?feature=endscreen&NR=1&v=s2bJki5gAgs

I chose to remain seated for the scene for a number of reasons: 
- I feel it would be unnatural for a psychologist to stand up mid-session, daydreaming or otherwise.
- I don't feel that standing up would give the dialogue any extra emphasis or meaning.
- I want to concentrate on animating a realistic performance, and as most of the expression lies in the human face, shoulders and hands, I don't want to give my self extra work by getting my character to stand up and walk around.
- I'd have to compromise the shot I'd want in order to show him standing, which would distract from the main focus (face, shoulders, hands).

Only two days after filming my acting reference, we were scheduled an acting lesson from Sarah Perry, a professional acting coach - if only I knew this before I attempted filming myself! In this session she took us through two main acting approaches - the Stanislavski technique of looking into the mind of the character, considering subtext & objectives and letting these factors control the acting, and the Larbin method of letting movement dictate the performance. Both are effective and interesting ways of going about acting, however I feel I identify more with Stanislavski's method acting approach, so I will try to apply it to my own characters, bearing in mind that the rules may not apply as the dialogue is mainly the thoughts, or subtext, of my main character.

                                      Dr. Ben Sobel                                            Caroline
           Action:         Seated, deep in thought.                       Seated, talking to Dr. Sobel.

           Given:                    Daytime, psychologist's office, doctor and patient. 

           Objective:    Listen to patient's problems                 Seek help from Doctor.
                                  without letting on boredom.

           Beats:          Change in tone of voice from               Wondering if Dr. Sobel is awake
                                 calm to angry.                                          or listening.

           Subtext:       Hates his job, tired of listening             Upset and distressed over how
                                 to people whine about their                  her current boyfriend is treating
                                 lives & loves.                                            her.

The subtext for Dr. Sobel's character is not simply guessed, as it is revealed in the sequel, 'Analyze That', that he only chose his career on account of his father. Research!

Later on in the week we had a guest lecture from a year 3 student on the motion capture software, 'IPi Soft'. This was a great experience as we could see first hand how motion capture is executed, as well as being given helpful tips on how to use the software itself, including calibration, jitter removal and using the 'Euler Filter'. Although I'd definitely want to experiment with the software and create some animation with it, 'Ipi Soft' is only really useful for capturing movement and action, and not so much for subtle performance animation. This is why I won't be using it for this unit's performance piece - my scene is driven by dialogue and my characters are seated.

Below is a clip taken from our Mocap lecture, acted and filmed by my friend, Lloyd.

Modelling - Part 2

In place of a lecture we had one of our tutors, Amin, teach us how to make a basic mesh of a human head in Maya. Unfortunately I was absent for this session due to ill-health, but one of my classmates kindly showed me what I'd missed. I knew that seeing the process alone would not help me remember it for very long, so I decided to do it myself and document the process so I could make my own pdf tutorial for future reference.


In a follow up session the next week, we learned how to use the software, 'Sculptris'. Similar to Mudbox and Zbrush, 'Sculptris' is a modelling tool comparable to sculpting a sphere of clay, but digitally. We started by importing a basic head mesh into the programme and experimenting with the tools it has to offer, such as 'grab', 'smooth', 'pinch' and 'crease'. I used these to give my mesh some more characteristic features, such as high cheekbones and a cleft chin.


We were then asked to create five different facial expressions, retaining the volume of the head. This was great for studying facial expressions and learning how to manipulate specific parts of the face in order to create the look wanted. However, in a real working scenario it is more likely that facial expressions are achieved through rig controls, not the mesh itself. As well as this, the polygon count was incredibly high for something that would be used for animation purposes, not to mention the fact that 'Sculptris' favours Tris over Quads - both factors would result in many problems when imported into Maya. Therefore, although it was useful for practice, in future I will opt for Mudbox or Zbrush over 'Sculptris'.


We also had an ex-Rave student come in to talk to us about modelling, whose portfolio of work was outstanding. He ran a quick workshop at the end of his talk where he asked us all to model a washer. After a good 15 minutes of frustration and experimentation, he showed us his workflow, and we picked up some knowledge of which tools to use, such as 'bevel'. Although it's by no means perfect, I'm happy with the finished result, and the talk has motivated me to practice my modelling more.

Morpheus

For our performance piece, we were told to download and use the 'Morpheus' rig.


I was unsure at first of its stylistic looking appearance, however once I started playing around with the controls and experimenting with its limitations, my opinion soon changed. In fact, the huge advantage this rig has over others is its huge variety of appearance-changing attributes. You can differentiate characters based on skin colour, eye colour, hair colour, hair style, size, gender - the possibilities are almost endless!
I experimented with the rig's capabilities by creating the three characters shown above: a large man, an elderly, spindly woman and a young girl. Pleased with the result, I then went on to posing each character respectively.
It was during this time I spent posing my characters that I was able to get a good grasp of the many Morpheus controls. The rig is extremely manageable and I'm sure I won't have many problems in getting it to do what I want it to do.

The next time I handled the rig was my first time animating the human face. I picked up some helpful tips from Keith Lango videos on lip sync animation, such as utilising the entire head for facial animation, not just the golden triangle (eyes & mouth). I also learned some terminology I hadn't come across before, such as 'saccadic eye movement' in which the eye stops a few times along its line of movement. After I'd read some more about lip sync, I was able to try it for myself with a sound clip given to me by my tutor.


As a first attempt, I'm pleased with the result. I like the eyebrow movement and the lips don't seem too forced or manipulated. There is a lot more to work on, however, so I'll need to get some practice in before I start animating my final performance piece.

All the World's a Stage!


For this unit, 'Character Animation', I will be studying performance; looking specifically at gestures, poses, expressions and lip synch. It will follow on from the last unit's work, 'Animation Techniques', as we will be applying the same principles but taking them further into what will hopefully be a realistic performance animation.

We've been asked to animate an audio clip with dialogue, lasting roughly 30 seconds. We have the choice to animate in either 2D or 3D - I have limited experience in both, but as I've devoted the last 4 months or so to Maya I will definitely be going down the 3D path.

The assessment criteria is as follows:


The first thing I need to do is find a piece of dialogue -  I want to find something that will challenge me, for example, a clip that covers a range of emotions, as opposed to a flat performance with one, single tone. It needs to be expressive and go on a journey, with gradual build ups in the speech, perhaps emphasised by slight crescendos in the vocal tone. Importantly, I want to find a dialogue with one or two pauses in between speech, to allow time for thought in the character which in turn will hopefully make my animation more realistic. This is because screen space is essential for conveying emotion.

After mentally combining these factors, I went online and searched through some of my favourite performances from some fantastic films and television shows.

Here are a few examples:

Rory Breaker - Lock, Stock and Two Smoking Barrels

Although the speech itself is not too imaginative, the performance is well paced and covers around three different emotions - especially noting the last few seconds where the change in tone is quite dramatic. It also includes pauses and a build up.


Combo - This Is England

This is possibly one of the best on-screen performances I've seen to this day; just looking at the expressions on Stephen Graham's face, not to mention his movement and gestures, is an excellent resource for animation purposes. I think this clip is too profane to animate considering that I hope to potentially use this work for my showreel, and I wouldn't know which 30 seconds to pick as all of it could work quite well for performance dialogue. Really great emotion driven piece, lots of spacing, dynamics and a range of different tones.


Tyres - Spaced (0.25-0.58)

This is obviously a far more comedic performance, which could be a lot of fun to work on. Michael Smiley is great at conveying emotion and delivering speech in a truly expressive and unique way. However, his character is very prone to mood swings (as shown in the clip), which would be great in terms of practicing animating different emotions, but without any character background information I worry that the dialogue may be a little to obscure to animate.


Del - Planes, Trains and Automobiles

John Candy managed to create a very touching scene with this dialogue, his timing is well done and not overly 'cheesy', giving plenty of screen space. The nuances in his voice also help set the emotional tone, along with the slight stammering which I think could be interesting to animate. There isn't as much dynamic range as some of the other clips I've been considering, but the slight change in tone towards the end creates a definite climax following the gradual build up throughout the scene.

I should note that the above clips make up just a fraction of the number of scenes I've been considering for this unit! I've had to rule out some of my favourites due to their popularity or cult reputation - I don't want to animate something that's already been done many times before - which meant getting rid of performances such as 'Ezekiel 25:17' by Samuel L. Jackson in Pulp Fiction, which starts out calm and ends in shouting. It also meant that I couldn't use the famous speech made by Charlie Chaplin at the end of The Great Dictator - an incredibly moving piece - which also had the drawback of having a poor-quality sound recording.

In the end, I settled for this clip:

Dr. Ben Sobel - Analyze This

Although the choice of film was not quite what I had in mind, this scene is almost perfect, in my opinion, for this unit. Billy Crystal is a great comedy actor who can jump from emotion to emotion with great ease, as demonstrated in the clip with the multiple different attitudes he gives to the screen - calm, serious, aggressive, sarcastic, and angry, to mention a few. This range of emotion will be great to practice different facial expressions, and it will be interesting to experiment with physical gestures and posing.

Modelling

Over the Easter holidays, we were asked to design and model a simple character which we could then potentially rig and use for the next unit, Character Animation. This began as quite a creative process, something which I enjoyed thoroughly - I looked at online resources for images of character sheets as a reference, including tips and advice on character design. Life drawing also proved to be a valuable resource, helping with perspective, proportion and different angles.


Once I'd decided to stick with 'Paul', my kind-but-timid, obese man, I started drawing the front, back and side images in Photoshop, in order to use them for referencing in Maya. It took longer than expected to match the proportions up correctly...


It was after I'd finished all of this work when I realised I'd made a 'big' mistake (pun intended). One of the first things I read in the modelling tutorial that I was about to begin, was that you should strictly avoid modelling large/fat/obese characters until you're very confident with the modelling and rigging process. This does essentially make sense, due to the huge amount of restriction that can be caused by oversized limbs, especially with movement and making sure, for example, that the arms don't swing through the torso. I also discovered at this stage that the tutorial was for modelling with NURBS - something I'd never tried before - so I started a very basic, simple model to start experimenting.


Getting used to the laborious naming conventions... (click image to enlarge)


I actually found that modelling with NURBS gave me a lot of freedom and control over the body shapes, as it was almost entirely done with lattices. However I felt it was almost too easy, as it didn't provide the detail and intricacies that I'd want from a humanistic model.

Evidence of attempting some realistic anatomy, indicated by the sloping blue line in the forearm.
The eyes, although slightly more challenging, were great fun to make. I applied a Phong texture to the eyeball itself, giving it a glossy appearance, and made a Ramp shader to go with it to make the pupil and iris. I attempted to give the eyelids a realistic looking ridge around the edge of their surface, and gave them controls so that they could be animated (see 'Start sweep' and 'End sweep').

Although NURBS modelling was great in terms of practice, I decided to discard my character so that I could start modelling with polygons again; this time hopefully creating something looking a little more professional. The character I created next was a frail looking, old man with a bit of a tummy (in lieu of my original character that I never got to model)! The character was a mixture of imagination and references from online resources.


I started modelling from the arm, as opposed to the torso which I'd done with the NURBS tutorial.
In order to create the head, I began with a simple polygon plane, rotated on its Z axis to line up with the side view of the face. I then added subdivisions and edge loops according to proper facial topology, and began to extrude the faces out and around the shape of the head.


I was amazed by just how much detail I could give this character, all within Maya - such as the rolls of flab, the knobbly fingers, and the bone definition in the knees and shins. I did come across a few problems with my obsessive fiddling with vertices and adding edge loops, such as finding and trying to get rid of Ngons, but after some scrutinization and playing around it didn't affect the work at all. 

The model is not yet finished, there are a great number of adjustments I need to make (such as pushing out the rib cage to create a more rounded torso), but I'm proud of how far I've managed to take this character. The next real step I need to make is learning the process of UV mapping, so that I can texture him and then eventually rig him.