February 11, 2013

Legs

The next step on the agenda was the infamous 'Walk Cycle' - a great example of pose-to-pose animation. We learnt the theory of the walk cycle by watching videos of Richard Williams explaining the process.


We then were given a new rig to use - a ball with two legs (somewhat reminiscent of Mike Wazowski from Monsters Inc)! This was very useful as it meant that we could grasp the basics of the walk cycle without having to worry about what happens with the rest of the body during a walk.


By changing the tangents to Linear and Stepped, it gives us control over what the rig is doing in the inbetweens, as opposed to Maya filling in the gaps incorrectly.

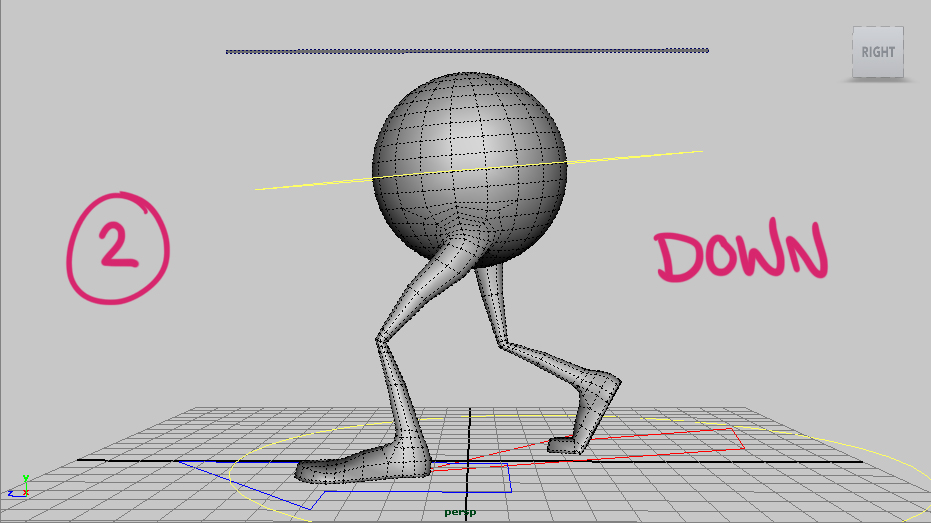
The first step was creating the main positions:


I added a plane above the rig so that I could judge how far up and down the body was moving; this helped give a sense of realism to the finished walk.

When the contact position is repeated (see '5'), the leading leg has changed. This means that when the other positions repeat, the adjustments for the legs have to swap around. Unfortunately, the 'copy paste' command doesn't work in Maya, so for each leg I had to individually type in each figure (translate xyz, heel pivot, ball roll, toe flop, etc).


To finish off, I cleaned up the animation by flattening tangents and smoothing the curves in the graph editor. This generally made the animation less jerky so that the rig could have a more fluid walk cycle.


As a first attempt, I'm happy with the finished product. There are alterations which could have been made to give the rig more personality (such as more emphasis on the swaying of the hips), but I think it works as a basic walk cycle.

There was little time for experimentation before we were given a brand new rig and a tutorial to follow. This meant I had to try to animate an entire body, which was substantially more challenging than only having to think about legs and hips!

This rig was a far sight more complex than the Mike Wazowski rig - you had the ability to edit movement of many different parts of the body (not just arms and legs)! This was great as it meant I had more control over what the body was doing, however it took a long time to get used to. The tutorial was in video format which meant that it was incredibly clear to follow and the voiceover explained the processes well for better understanding.

As I went through the tutorial, I took screenshots of each stage of animation and annotated what I was doing for every step. My memory isn't the strongest, so this means that if I wanted to make a walk cycle a year from now, I can look at these images again and understand clearly what to do.


There's little I can say in terms of evaluation, as I more or less just followed what the tutorial showed me. I do like the final outcome however, the body definitely appears to have weight and I like the slight bounce in its step. In fact, my main criticism would be with the camera work - I wanted to get it to glide seamlessly around the rig, pausing at 4 different angles, but it didn't quite work as planned. 

The tutorial taught me a great deal in terms of how the body moves whilst walking - to what extent the head moves, the rotation of the hips, overlap in the wrists and so on. It also really emphasised how powerful the graph editor is and that even by changing one tangent, or adjusting one curve, the whole walk can be transformed.
 After 5 weeks worth of using Maya, including some experimenting during the winter holidays, I thought it would be worthwhile documenting some of the things I'd learned. The document above contains a number of different commands, some more commonly used than others, and shortcuts for ease of use. Hopefully it will prove useful to me, especially as time goes on and I inevitably forget how to do simple commands in Maya; I will continue to update it as I learn more about the software.

Tails

This week was my first ever experience animating a rig! Using a ball with a fox tail attached to it, we learned how to use the principle of overlap - when a part of the body moves at a different rate to the main body and needs to catch up. For the rig, it meant that if the ball moved somewhere, its tail would drag in the opposite direction to create the illusion of weight.


We were shown a tutorial by Keith Lango, stating exactly how overlap is animated and tips on how to make it look realistic. This was incredibly helpful, but the best way to learn, I find, is doing it yourself...


The animation process was somewhat more difficult than that of the simple ball tests, as we had to manipulate the rig using three handles (not the joints). These handles could be quite temperamental, especially if they crossed over or stretched too far!

I was quite pleased with these tests as a first attempt, but the overlap is not as realistic as I'd like. It gives an impression of springiness, which makes the tail seem more solid as opposed to bushy and flowing.


I felt like I needed a reference, but as I don't have any balls with tails lying around, I thought I'd try filming myself holding a piece of fabric. I'm happy with the reference, however it would have been a great deal better if I'd kept my hand more stable and if I'd found something to move that was a little more weighted.


The next step was setting up a scene in Maya and importing the reference video as a .iff sequence. I also added some directional light to create a shadow of the ball and tail on the back wall.


I found the rotoscoping process for the ball and tail more difficult than I had done in the past - having to adjust three handles to get the exact position without deforming the tail was definitely more challenging than just moving one ball!

What made things worse was trying to animate the z axis to create depth - obviously with just a 2D reference point, it was guess work trying to assess how far back and forward the tail was spinning. Unfortunately, in doing this I'd ruined the effect of the original overlap.


Not a success. Nor does it feel very realistic - the tail seems to have a life of its own and keeps swinging, which makes it appear far lighter than it should be. It is also obvious that the tail isn't connected to ball where it should be; instead, the tail goes right into the centre of the ball which means that during the big swings at the beginning, the tail travels through the surface of the ball. Also, I clearly made a mistake at some point and deformed the tail - it shouldn't look curved or rigid!

In future, before focusing too hard on rotoscoping, I should find a better reference video that correctly matches the weight of what I want to animate. 

The next challenge was getting the ball and tail to travel up a flight of stairs... with character. Therefore, the ball had to show thought, which could be done using the principles of anticipation and exaggeration. The tail, on the other hand, had to be lifeless - pulled along by the ball's movement and gravity to emphasise the principle of overlap.


In the first three frames of my storyboard, it is clear that I hadn't quite grasped the 'lifeless' aspect of the tail and instead made it somewhat squirrel-like...!

The first step I took was blocking out the action of my ball in Maya, although the timing at this stage was quite different to what it was by the end of the animation. I then focused on achieving realistic bounces and arcs for the ball and added some squash and stretch afterwards for appeal. I didn't want to start thinking about the tail or camera angles until the ball was perfect.


I then started the long process of animating overlap in the tail by adjusting the three individual handles. To challenge myself, before each bounce to the next step, I made sure to emphasise the ball's anticipation by incorporating even more overlap in the tail, but in a different direction (eg. side to side, as opposed to the usual up and down).

Unfortunately, Maya glitched during this process (see image above) meaning that I had to start the overlap again from the beginning.


The most challenging part of this animation was making the ball and tail tumble down the stairs. Rotating the ball was not the problem, but getting the tail to wrap around the ball as it spun around was near impossible - the rig wasn't designed for it! This meant that I had to adjust the tail for near on every single frame, otherwise it would snap from side to side and stretch out in different directions (very peculiar).


On the whole, I was pleased with the outcome, although there are a few slips and mistakes - for example, after bouncing on the first step, the last flick of the tail travels upwards too quickly and too far to seem like realistic overlap, and there doesn't seem to be enough overlap on the bounce to the second step.


The finished animation! I much prefer this cinematic style as opposed to just one plain wide shot, not only was it enjoyable adding in different camera angles, but it meant I could emphasise my favourite parts and draw attention away from parts that I didn't like so much. However, if I were to do it again, I would not have so many different shots during the last few seconds as seems quite messy.

February 4, 2013

Even More Bouncing Ball Tests

To experiment with arcs and to get used to using references for animating, we learned how to import a movie into Maya through the image plane. This involved saving the video clip as an image sequence in Adobe After Effects, importing it into Maya, then importing it to FCheck and saving it as a .IFF sequence, then importing that sequence into Maya - a somewhat complicated process! It was a valuable lesson, however, as it helped to create a very realistic looking animation and showed us how to do rotoscoping for future work.

I used a clip of a basketball taken from a reference video I posted earlier in the blog from youtube, as I wanted to experiment with some rotation.


After importing the image sequence into Maya, I added a resolution gate and a safe action grid so I could keep my animation in frame. After this, I started the keyframing process, making a keyframe whenever the basketball hit the ground and when it was at its highest mid-bounce. Using a reference within the programme made this process far easier than usual! All I had to do was refine the bounces by adjusting the graph editor according to where the reference basketball was on screen.


Before I started rotating the ball, I added a 'ramp' texture to the sphere, adjusting the colour widths so that I could have a coloured strip going around its circumference. Then, using the rotate tool, I adjusted the dimensions to copy what the white strip was doing in the reference video.


I thought this test went quite successfully, although I would like to attempt it again using a different reference video so I can properly get the hang of rotoscoping and so I can experiment more with arcs.


I also made note of how to render through the camera view.

Here is a second test, using a different clip from the basketball reference video:


I thought this test went quite successfully as both the bounces and rotation look authentic, and adding the original audio to the clip helps make the animation look more convincing. Also, I found I could add realism by taking advantage of 3D and adjusting the z translation so that the ball wouldn't just bounce in a straight line. I do think, however, that it could be further improved by adding an element of 'Squash & Stretch'.

At this stage, I had done a lot of animating of bouncing balls, but hadn't yet tried animating a ball bouncing off a wall. My first step was finding a decent reference video off youtube, however after much searching, I couldn't find what I was looking for. So I decided I would give it a try without any reference, and film my own reference video in the morning.


Adjusting my arcs using 'ghost selected' from the animation menu.


Although it started off well, it is pretty obvious that I needed a reference! It seems as if the ball slows down as it hits the wall and when it bounces back in the opposite direction it has a sudden surge of energy, which makes it look very unrealistic.


My reference video did not go quite as planned - the framing meant that I could only see the bounce against the wall and not much else. I need to invest in a better ball if I plan on filming something like this again! 


Regardless, the reference video was still very much useable as I only wanted to do a simple test. Using FCheck, I imported the video into Maya as an image plane and began to animate. The impact of the ball bouncing off the wall was so quick that it only took a matter of frames, so it was barely worth doing the test at all! I then decided to work on changing the z translation so I could get used to adding depth. It meant that half way through the animation, the ball went through the image plane. Fortunately, Maya has a feature meaning that in perspective view you can view the image plane from the back and the film clip will still be visible.


After adjusting my arcs, I dragged all of the y-axis keyframes down so that they would bounce at the same point of contact whilst maintaining their arcs - I also set up some surroundings for the ball. Despite it being a small, simple test, I think it works quite well. If I wanted to spend extra time on it, I would have added in some rotation and continued animating until the ball came to a standstill.

This was also my first ever render on Maya - I learnt how to do this through online resources. The rendering itself was simple but time consuming - batch rendering TIFF images of every frame, then importing them as an image sequence into Adobe After Effects and exporting as a QuickTime movie. However, next time I will make sure to do a better crop and improve my framing!

January 26, 2013

More Bouncing Ball Tests


My next step was to create a bouncing ball in Maya by using one of my reference videos - I chose my rubber ball bounce as it gave me lots to work with (compared to the fruit and vegetables)! However, I found it very difficult to assess timing and spacing through watching the video alone - counting out loud was not accurate enough for what I wanted. So I took a different stance by using the sound of the video clip. I loaded it up in Adobe Audition, and the wave form showed precisely and clearly the timing of the ball bouncing on the ground.

I wanted to use this as my reference, so I amplified the wave form so that the loudest point would be even more visible next to the timeline. The tricky part was translating the timings into keyframes on maya.


My method was this: 
For each second, I have 24 frames (I realise now that I should've have been working in 25fps)! So if the ball lands at 4.625 seconds, that means that it occurs at 96 frames (4 seconds worth) plus 0.625ths of a second (0.625 x 24 frames = 15 frames) meaning that the bounce would lie at 111 frames into the animation. I did this for every bounce until the bounces became extremely close together.

After this I went back and placed a keyframe halfway between the original keyframes for the high point of the bounce. I did some adjusting by using the Dope Sheet editor.


My technique for judging the distance between the high points of the bounces was less technical. Again, just watching my reference video wasn't accurate enough, but I needed a basic reference to make sure my bouncing ball was as similar to the video as possible. 


My solution was opening up the image I'd made earlier of the bouncing ball path and adjusting it so the ball in the image and the ball in Maya were the same size. In side view, I aligned the line where the ball hits the ground with the x axis and used it to judge how high the ball would bounce. What would have made it easier was if I simply used an image plane, which I did not realise at the time!


I then spent a lot of time on the graph editor, adjusting and refining my curves and adding a 'Slow in' in the beginning, as opposed to an anticipation. 

When I finished the animation, I added the audio of the reference video to the playblast using Adobe Premiere Pro to see if the two matched up without need for any adjustments...


Success! I'm pleased with the finished result in terms of weight, and therefore timing and spacing. However, when I get more time I want to add some rotation to the ball and get it to change direction more - in the reference video it doesn't bounce in a perfect straight line!

I then wanted to try animating a ball of a different weight - I looked through my reference videos and decided to try animating the clip of the tomato. Being relatively heavy, it only bounced twice so I hoped it would be a stark contrast to the rubber ball.


Using Photoshop, I tried making another image showing the motion path of the tomato. Unfortunately, it didn't prove to be very useful as a reference!


Modelling my tomato-shaped ball...!


The timing and spacing was very different to that of the lighter, rubber ball, and because of this the movement of the tomato was certainly sharper and more sudden. I do feel this animation seems slightly less realistic to my previous one:
1. At the end, the tomato wobbles too slowly. 
2. Where the tomato bounces to the side, it seems weightless.

I had more problem with the second issue; although I like the arc, the tomato seems to bounce too high and too far to the left (despite it being accurate). I tried to amend this by speeding up the timing slightly, although this made it look like it was glitching. Finally, I edited the keyframes of the x axis in the graph editor which ended up making it much more realistic.

This week I also learned how to do the principle 'Squash & Stretch' the correct way in Maya (ie. not changing the scale)!


I did this by using a 'Squash handle' found in the 'Create deformers' menu bar, wherein you would adjust the factor in order to make the sphere squash sideways or lengthways. There was quite a lot of flexibility to it as you could adjust the height of the handles depending on how much squash or stretch you wanted.


I really enjoyed using this method as it gave quite a bit of appeal to just a simple ball - I thought I'd emphasise this by making the ball bounce higher at the end (as opposed to lower) to make it seem like it had a life of its own.

January 19, 2013

Bouncing Ball Tests

As an introduction to the principles of animation and to the 3D modelling software, Maya, this week I've been attempting the bouncing ball test. I plan on experimenting by putting some of the principles in practice, such as 'Squash & Stretch', 'Anticipation', 'Slow in & Slow out', and most importantly, 'Timing & Spacing'. Hopefully it will also help me learn the interface for animating in Maya.

I did a few bouncing ball tests using Toon Boom Studio in my free time last term - however I did not pay much attention to the laws of physics:


In fact, the only principle that's obvious to me here is 'Squash & Stretch', which I've been quite liberal with, and on the whole, the weights of these balls seem totally unclear (note the yellow one flying into space). As a first try, I was content; but now I want to move on and do this test correctly by doing some research prior to animating.

I did some searching on youtube to see what I could find in terms of live action bouncing ball tests, and I came across a few I thought I might be able to use as references.


Although it only represents one particular type/weight of ball, I found this video to be very clear - most of the action is on screen (as opposed to off camera), and the white band around the ball will be helpful when I learn about rotation later on.


I liked this video for the sheer variety of balls he used to test with. However there is a big fault in that the surface he's using is uneven, which was most obvious when bouncing the exercise ball. This was disappointing because, in my opinion, the exercise ball had the most interesting bounce!

After seeing these examples, I wanted to make my own reference video - which proved to be more challenging than expected! 

My first problem was that I don't own many balls, hence the fruit and vegetables, so I only really have one reference clip here. Also I think the quality of the video would be improved by having more natural light, so I should have started filming earlier on in the day. I had wanted to experiment with different surfaces (ie. a carpet) to see how it would impact the bounce, however it took so long getting the rubber ball to be in shot for the duration of the bounce test that my patience wore thin!

I wanted to see the path of motion of my rubber ball, but the software I wanted to use to do this turned out to not be compatible with macs. My solution was somewhat longwinded - I took many, many screenshots of the video, put them into photoshop and started merging them together:


As you can see, the ball path is extremely faint, and as the layers started building up it began to look very messy. I eventually had to delete everything and start with a new idea - seeing how high the rubber ball was bouncing. I watched the video back and started taking screenshots when the ball was at its highest and its lowest. I then put these images into photoshop and started the editing process again.


These technique turned out to be a lot less messy! It also gave me a very good idea of spacing - I helped visualise this better by creating lines on the side of the image to get a better idea of idea of distance between the bounces.


The next step was Maya. Before trying to replicate the bounce of my rubber ball, I firstly wanted to try to get used to the interface by creating a simple and (hopefully) realistic ball bounce. I started by putting in my keyframes when I wanted the ball to hit the ground and when I wanted it at its highest, then adjusted the position of the ball accordingly. The fun part was playing around with the graph editor to give the ball some weight and realism.


I played with the tangents to get some nice curves - my bounces were most effective when I broke these tangents so I could achieve a 'fast in/fast out' as the ball hit the ground.


I also found that free tangent weights affected the shape of my curve quite significantly.


My first attempt at an 'anticipation' using the graph editor.

I liked the finished result; it wasn't accurate but it helped me put the principles 'Timing and Spacing', 'Anticipation' and 'Slow in/Slow out' into practice. Using a reference next time will hopefully make the bounce more realistic and give the ball some much needed weight!